“Shard. Or do not shard. There is no try.”
— Yoda
This is a technical dive into how we split our data across many MySQL servers. We finished launching this sharding approach in early 2012, and it’s still the system we use today to store our core data.
Before we discuss how to split the data, let’s be intimate with our data. Mood lighting, chocolate covered strawberries, Star Trek quotes…
Pinterest is a discovery engine for everything that interests you. From a data perspective, Pinterest is the largest human curated interest graph in the world. There are more than 50 billion Pins that have been saved by Pinners onto one billion boards. People repin and like other Pins (roughly a shallow copy), follow other Pinners, boards and interests, and view a home feed of all the Pinners, boards and interests they follow. Great! Now make it scale!
Growing pains
In 2011, we hit traction. By some estimates, we were growing faster than any other previous startup. Around September 2011, every piece of our infrastructure was over capacity. We had several NoSQL technologies, all of which eventually broke catastrophically. We also had a boatload of MySQL slaves we were using for reads, which makes lots of irritating bugs, especially with caching. We re-architected our entire data storage model. To be effective, we carefully crafted our requirements.
Requirements
- Our overall system needed to be very stable, easy to operate and scale to the moon. We wanted to support scaling the data store from a small set of boxes initially to many boxes as the site grows.
- All Pinner generated content must be site accessible at all times.
- Support asking for N number of Pins in a board in a deterministic order (such as reverse creation time or user specified ordering). Same for Pinner to likes, Pinner to Pins, etc.
- For simplicity, updates will generally be best effort. To get eventual consistency, you’ll need some additional toys on top, such as a distributed transaction log. It’s fun and (not too) easy!
Design philosophies and notes
Since we wanted this data to span multiple databases, we couldn’t use the database’s joins, foreign keys or indexes to gather all data, though they can be used for subqueries that don’t span databases.
We also needed to support load balancing our data. We hated moving data around, especially item by item, because it’s prone to error and makes the system unnecessarily complex. If we had to move data, it was better to move an entire virtual node to a different physical node.
In order for our implementation to mature quickly, we needed the simplest usable solution and VERY stable nodes in our distributed data platform.
All data needed to be replicated to a slave machine for backup, with high availability and dumping to S3 for MapReduce. We only interact with the master in production. You never want to read/write to a slave in production. Slaves lag, which causes strange bugs. Once you’re sharded, there’s generally no advantage to interacting with a slave in production.
Finally, we needed a nice way to generate universally unique IDs (UUID) for all of our objects.
How we sharded
Whatever we were going build needed to meet our needs and be stable, performant and repairable. In other words, it needed to not suck, and so we chose a mature technology as our base to build on, MySQL. We intentionally ran away from auto-scaling newer technology like MongoDB, Cassandra and Membase, because their maturity was simply not far enough along (and they were crashing in spectacular ways on us!).
Aside: I still recommend startups avoid the fancy new stuff — try really hard to just use MySQL. Trust me. I have the scars to prove it.
MySQL is mature, stable and it just works. Not only do we use it, but it’s also used by plenty of other companies pushing even bigger scale. MySQL supports our need for ordering data requests, selecting certain ranges of data and row-level transactions. It has a hell of a lot more features, but we don’t need or use them. But, MySQL is a single box solution, hence the need to shard our data. Here’s our solution:
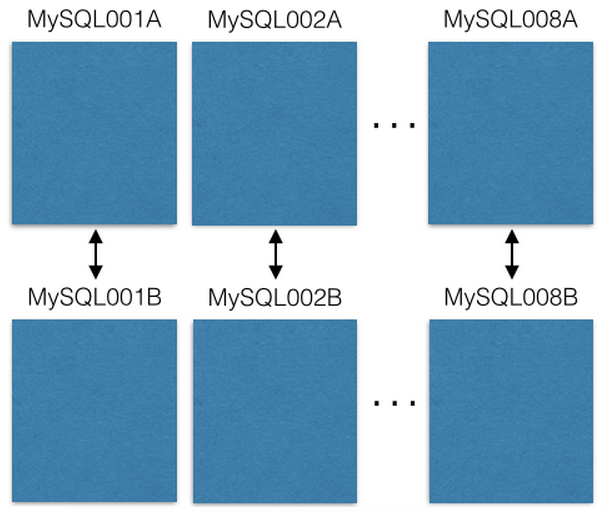
We started with eight EC2 servers running one MySQL instance each:
Each MySQL server is master-master replicated onto a backup host in case the primary fails. Our production servers only read/write to the master. I recommend you do the same. It simplifies everything and avoids lagged replication bugs.
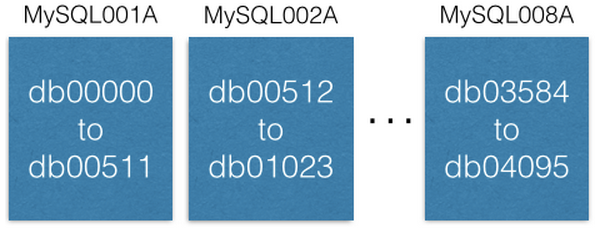
Each MySQL instance can have multiple databases:
Notice how each database is uniquely named db00000, db00001, to dbNNNNN. Each database is a shard of our data. We made a design decision that once a piece of data lands in a shard, it never moves outside that shard. However, you can get more capacity by moving shards to other machines (we’ll discuss this later).
We maintain a configuration table that says which machines these shards are on:
[{“range”:     (0,511), “master”: “MySQL001A”, “slave”: “MySQL001B”},
 {“range”: (512, 1023), “master”: “MySQL002A”, “slave”: “MySQL002B”},
    ...
 {“range”: (3584, 4095), “master”: “MySQL008A”, “slave”: “MySQL008B”}]
This config only changes when we need to move shards around or replace a host. If a master dies, we can promote the slave and then bring up a new slave. The config lives in ZooKeeper and, on update, is sent to services that maintain the MySQL shard.
Each shard contains the same set of tables: pins, boards, users_has_pins, users_likes_pins, pin_liked_by_user, etc. I’ll expand on that in a moment.
So how do we distribute our data to these shards?
We created a 64 bit ID that contains the shard ID, the type of the containing data, and where this data is in the table (local ID). The shard ID is 16 bits, type ID is 10 bits and local ID is 36 bits. The savvy additionology experts out there will notice that only adds to 62 bits. My past in compiler and chip design has taught me that reserve bits are worth their weight in gold. So we have two (set to zero).
ID = (shard ID << 46) | (type ID << 36) | (local ID<<0)
Given this Pin: https://www.pinterest.com/pin/241294492511762325/, let’s decompose the Pin ID 241294492511762325:
Shard ID = (241294492511762325 >> 46) & 0xFFFF = 3429
Type ID  = (241294492511762325 >> 36) & 0x3FF = 1
Local ID = (241294492511762325 >>  0) & 0xFFFFFFFFF = 7075733
So this Pin object lives on shard 3429. It’s type is 1 (i.e. ‘Pin’), and it’s in the row 7075733 in the pins table. For an example, let’s assume this shard is on MySQL012A. We can get to it as follows:
conn = MySQLdb.connect(host=”MySQL012A”)
conn.execute(“SELECT data FROM db03429.pins where local_id=7075733”)
There are two types of data: objects and mappings. Objects contain details, such as Pin data.
Object Tables!
Object tables, such as Pins, users, boards and comments, have an ID (the local ID, an auto-incrementing primary key) and a blob of data that contains a JSON with all the object’s data.
CREATE TABLE pins (
  local_id INT PRIMARY KEY AUTO_INCREMENT,
  data TEXT,
  ts TIMESTAMP DEFAULT CURRENT_TIMESTAMP
) ENGINE=InnoDB;
For example, a Pin object looks like this:
{“details”: “New Star Wars character”, “link”: “http://webpage.com/asdf”, “user_id”: 241294629943640797, “board_id”: 241294561224164665, …}
To create a new Pin, we gather all the data and create a JSON blob. Then, we decide on a shard ID (we prefer to choose the same shard ID as the board it’s inserted into, but that’s not necessary). The type is 1 for Pin. We connect to that database, and insert the JSON into the pins table. MySQL will give back the auto-incremented local ID. Now we have the shard, type and new local ID, so we can compose the full 64 bit ID!
To edit a Pin, we read-modify-write the JSON under a MySQL transaction:
> BEGIN
> SELECT blob FROM db03429.pins WHERE local_id=7075733 FOR UPDATE
[Modify the json blob]
> UPDATE db03429.pins SET blob=’<modified blob>’ WHERE local_id=7075733
> COMMIT
To delete a Pin, you can delete its row in MySQL. Better, though, would be to add a JSON field called ‘active’ and set it to ‘false’, and filter out results on the client end.
Mapping Tables!
A mapping table links one object to another, such as a board to the Pins on it. The MySQL table for a mapping contains three columns: a 64 bit ‘from’ ID, a 64 bit ‘to’ ID and a sequence ID. There are index keys on the (from, to, sequence) triple, and they live on the shard of the ‘from’ ID.
CREATE TABLE board_has_pins (
  board_id INT,
  pin_id INT,
  sequence INT,
  INDEX(board_id, pin_id, sequence)
) ENGINE=InnoDB;
Mapping tables are unidirectional, such as a board_has_pins table. If you need the opposite direction, you’ll need a separate pin_owned_by_board table. The sequence ID gives an ordering (our ID’s can’t be compared across shards as the new local ID offsets diverge). We usually insert new Pins into a new board with a sequence ID = unix timestamp. The sequence can be any numbers, but a unix timestamp is a convenient way to force new stuff always higher since time monotonically increases. You can look stuff up in the mapping table like this:
SELECT pin_id FROM board_has_pins
WHERE board_id=241294561224164665 ORDER BY sequence
LIMIT 50 OFFSET 150
This will give you up to 50 pin_ids, which you can then use to look up Pin objects.
What we’ve just done is an application layer join (board_id -> pin_ids -> pin objects). One awesome property of application layer joins is that you can cache the mapping separate from the object. We keep pin_id -> pin object cache in a memcache cluster, but we keep board_id -> pin_ids in a redis cluster. This allows us to choose the right technology to best match the object being cached.
Adding more capacity
In our system, there are three primary ways to add more capacity. The easiest is to upgrade the machines (more space, faster hard drives, more RAM, whatever your bottleneck is).
The next way to add more capacity is to open up new ranges. Initially, we only created 4,096 shards even though our shard ID is 16 bits (64k total shards). New objects could only be created in these first 4k shards. At some point, we decided to create new MySQL servers with shards 4,096 to 8,191 and started filling those.
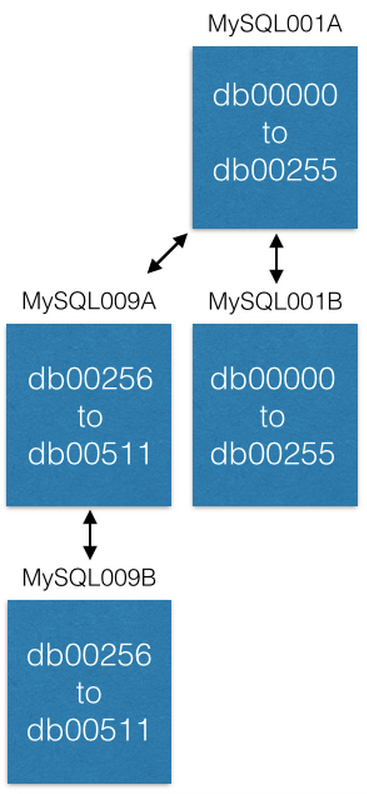
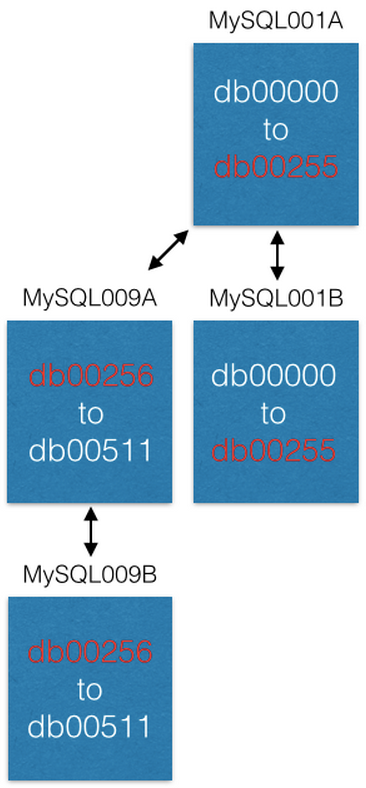
The final way we add capacity is by moving some shards to new machines. If we want to add more capacity to MySQL001A (which has shards 0 to 511), we create a new master-master pair with the next largest names (say MySQL009A and B) and start replicating from MySQL001A.
Once replication is complete, we change our configuration so that MySQL001A only has shards 0 to 255, and MySQL009A only has 256 to 511. Now each server only has to handle half the shards as it previously did.
Some nice properties
For those of you who have had to build systems for generating new UUIDs, you’ll recognize that we get them for free in this system! When you create a new object and insert it into an object table, it returns a new local ID. That local ID combined with the shard ID and type ID gives you a UUID.
For those of you who have performed ALTERs to add more columns to MySQL tables, you’ll know they can be VERY slow and are a big pain. Our approach does not require any MySQL level ALTERs. At Pinterest, we’ve probably performed one ALTER in the last three years. To add new fields to objects, simply teach your services that your JSON schema has a few new fields. You can have a default value so that when you deserialize JSON from an object without your new field, you get a default. If you need a mapping table, create the new mapping table and start filling it up whenever you want. When you’re done, ship your product!
The Mod Shard
It’s just like the Mod Squad, only totally different.
Some objects need to be looked up by a non-ID. For instance, if a Pinner logs in with their Facebook account, we need a mapping from Facebook IDs to Pinterest IDs. Facebook IDs are just bits to us, so we store them in a separate shard system called the mod shard. Other examples include IP addresses, username and email.
The mod shard is much like the shard system described in the previous section, but you can look up data with arbitrary input. This input is hashed and modded against the total number of shards that exist in the system. The result is the shard the data will live on / already lives on. For example:
shard = md5(“1.2.3.4") % 4096
shard in this case would be 1524. We maintain a config file similar to the ID shard:
[{“range”:    (0,  511), “master”: “msdb001a”, “slave”: “msdb001b”},
  {“range”:  (512, 1023), “master”: “msdb002a”, “slave”: “msdb002b”},
  {“range”: (1024, 1535), “master”: “msdb003a”, “slave”: “msdb003b”},
…]
So, to find data about IP address 1.2.3.4, we would do this:
conn = MySQLdb.connect(host=”msdb003a”)
conn.execute(“SELECT data FROM msdb001a.ip_data WHERE ip='1.2.3.4'”)
You lose some nice properties of the ID shard, such as spacial locality. You have to start with all shards made in the beginning and create the key yourself ( it will not make one for you). Always best to represent objects in your system with immutable IDs. That way you don’t have to update lots of references when, for instance, a user changes their username.
Last Thoughts
This system has been in production at Pinterest for 3.5 years now and will likely be in there forever. Implementing it was relatively straightforward, but turning it on and moving all the data over from the old machines was super tough. If you’re a startup facing growing pains and you just built your new shard, consider building a cluster of background processing machines (pro-tip use pyres) to script moving your data from your old databases to your shiny new shard. I guarantee that data will be missed no matter how hard you try (gremlins in the system, I swear), so repeat the data transfer over and over again until the new things being written into the new system are tiny or zero.
This system is best effort. It does not give you Atomicity, Isolation or Consistency in all cases. Wow! That sounds bad! But don’t worry. You’re probably fine without these guarantees. You can always build those layers in with other processes/systems if needed, but I’ll tell you what you get for free: the thing just works. Good reliability through simplicity, and it’s pretty damn fast. If you’re worried about A, I and C, write me. I can help you think through these issues.
But what about failover, huh? We built a service to maintain the MySQL shards. We stored the shard configuration table in ZooKeeper. When a master server dies, we have scripts to promote the slave and then bring up a replacement machine (plus get it up to date). Even today we don’t use auto-failover.
Acknowledgements: Yash Nelapati, Ryan Probasco, Ryan Park and I built the Pinterest sharding system with loving guidance from Evan Priestley. Red Bull and coffee made it run.
Source: https://medium.com/@Pinterest_Engineering/sharding-pinterest-how-we-scaled-our-mysql-fleet-3f341e96ca6f


