Thứ Năm, 25 tháng 12, 2014

CentOS / Redhat Linux: Install Keepalived To Provide IP Failover For Web Cluster

Keepalived provides a strong and robust health checking for LVS clusters. It implements a framework of health checking on multiple layers for server failover, and VRRPv2 stack to handle director failover. How do I install and configure Keepalived for reverse proxy server such as nginx or lighttpd?

If your are using a LVS director to loadbalance a server pool in a production environment, you may want to have a robust solution for healthcheck & failover. This will also work with reverse proxy server such as nginx.

Our Sample Setup

Internet--
         |
    =============
    | ISP Router|
    =============
         |
         |
         |      |eth0 -> 192.168.1.11 (connected to lan)
         |-lb0==|
         |      |eth1 -> 202.54.1.1 (vip master)
         |
         |      |eth0 -> 192.168.1.10 (connected to lan)
         |-lb1==|
                |eth1 -> 202.54.1.1 (vip backup)
Where,
  • lb0 - Linux box directly connected to the Internet via eth1. This is master load balancer.
  • lb1 - Linux box directly connected to the Internet via eth1. This is backup load balancer. This will become active if master networking failed.
  • 202.54.1.1 - This ip moves between lb0 and lb1 server. It is called virtual IP address and it is managed by keepalived.
  • eth0 is connected to LAN and all other backend software such as Apache, MySQL and so on.
You need to install the following softwares on both lb0 and lb1:
  • keepalived for IP failover.
  • iptables to filter traffic
  • nginx or lighttpd revers proxy server.
DNS settings should be as follows:
  1. nixcraft.in - Our sample domain name.
  2. lb0.nixcraft.in - 202.54.1.11 (real ip assigned to eth1)
  3. lb1.nixcraft.in - 202.54.1.12 (real ip assigned to eth1)
  4. www.nixcraft.in - 202.54.1.1 (VIP for web server) do not assign this IP to any interface.

Install Keepalived

Visit keepalived.org to grab latest source code. You can use the wget command to download the same (you need to install keepalived on both lb0 and lb1):
# cd /opt
# wget http://www.keepalived.org/software/keepalived-1.1.19.tar.gz
# tar -zxvf keepalived-1.1.19.tar.gz
# cd keepalived-1.1.19

Install Kernel Headers

You need to install the following packages:
  1. Kernel-headers - includes the C header files that specify the interface between the Linux kernel and userspace libraries and programs. The header files define structures and constants that are needed for building most standard programs and are also needed for rebuilding the glibc package.
  2. kernel-devel - this package provides kernel headers and makefiles sufficient to build modules against the kernel package.
Make sure kernel-headers and kernel-devel packages are installed. If not type the following install the same:
# yum -y install kernel-headers kernel-devel

Compile keepalived

Type the following command:
# ./configure --with-kernel-dir=/lib/modules/$(uname -r)/build
Sample outputs:
checking for gcc... gcc
checking for C compiler default output file name... a.out
checking whether the C compiler works... yes
checking whether we are cross compiling... no
checking for suffix of executables...
checking for suffix of object files... o
...
.....
..
config.status: creating keepalived/check/Makefile
config.status: creating keepalived/libipvs-2.6/Makefile
Keepalived configuration
------------------------
Keepalived version       : 1.1.19
Compiler                 : gcc
Compiler flags           : -g -O2
Extra Lib                : -lpopt -lssl -lcrypto
Use IPVS Framework       : Yes
IPVS sync daemon support : Yes
Use VRRP Framework       : Yes
Use Debug flags          : No
Compile and install the same:
# make && make install

Create Required Softlinks

Type the following commands to create service and run it at RHEL / CentOS run level #3 :
# cd /etc/sysconfig
# ln -s /usr/local/etc/sysconfig/keepalived .
# cd /etc/rc3.d/
# ln -s /usr/local/etc/rc.d/init.d/keepalived S100keepalived
# cd /etc/init.d/
# ln -s /usr/local/etc/rc.d/init.d/keepalived .

Configuration

Your main configuration directory is located at /usr/local/etc/keepalived and configuration file name is keepalived.conf. First, make backup of existing configuration:
# cd /usr/local/etc/keepalived
# cp keepalived.conf keepalived.conf.bak

Edit keepalived.conf as follows on lb0:
vrrp_instance VI_1 {
        interface eth0
        state MASTER
        virtual_router_id 51
        priority 101
        authentication {
            auth_type PASS
            auth_pass Add-Your-Password-Here
        }
        virtual_ipaddress {
                202.54.1.1/29 dev eth1
        }
}
Edit keepalived.conf as follows on lb1 (note priority set to 100 i.e. backup load balancer):
vrrp_instance VI_1 {
        interface eth0
        state MASTER
        virtual_router_id 51
        priority 100
        authentication {
            auth_type PASS
            auth_pass Add-Your-Password-Here
        }
        virtual_ipaddress {
                202.54.1.1/29 dev eth1
        }
}
Save and close the file. Finally start keepalived on both lb0 and lb1 as follows:
# /etc/init.d/keepalived start

Verify: Keepalived Working Or Not

/var/log/messages will keep track of VIP:
# tail -f /var/log/messages
Sample outputs:
Feb 21 04:06:15 lb0 Keepalived_vrrp: Netlink reflector reports IP 202.54.1.1 added
Feb 21 04:06:20 lb0 Keepalived_vrrp: VRRP_Instance(VI_1) Sending gratuitous ARPs on eth1 for 202.54.1.1
Verify that VIP assigned to eth1:
# ip addr show eth1
Sample outputs:
3: eth1:  mtu 1500 qdisc pfifo_fast qlen 10000
    link/ether 00:30:48:30:30:a3 brd ff:ff:ff:ff:ff:ff
    inet 202.54.1.11/29 brd 202.54.1.254 scope global eth1
    inet 202.54.1.1/29 scope global secondary eth1

ping failover test

Open UNIX / Linux / OS X desktop terminal and type the following command to ping to VIP:
# ping 202.54.1.1
Login to lb0 and halt the server or take down networking:
# halt
Within seconds VIP should move from lb0 to lb1 and you should not see any drops in ping. On lb1 you should get the following in /var/log/messages:
Feb 21 04:10:07 lb1 Keepalived_vrrp: VRRP_Instance(VI_1) forcing a new MASTER election
Feb 21 04:10:08 lb1 Keepalived_vrrp: VRRP_Instance(VI_1) Transition to MASTER STATE
Feb 21 04:10:09 lb1 Keepalived_vrrp: VRRP_Instance(VI_1) Entering MASTER STATE
Feb 21 04:10:09 lb1 Keepalived_vrrp: VRRP_Instance(VI_1) setting protocol VIPs.
Feb 21 04:10:09 lb1 Keepalived_healthcheckers: Netlink reflector reports IP 202.54.1.1 added
Feb 21 04:10:09 lb1 Keepalived_vrrp: VRRP_Instance(VI_1) Sending gratuitous ARPs on eth1 for 202.54.1.1

Conclusion

Your server is now configured with IP failover. However, you need to install and configure the following software in order to configure webserver and security:
  1. nginx or lighttpd
  2. iptables
Stay tuned, for more information on above configuration.

Source: http://www.cyberciti.biz/faq/rhel-centos-fedora-keepalived-lvs-cluster-configuration/
Website đang đọc

http://stackoverflow.com/questions/8750518/difference-between-global-maxconn-and-server-maxconn-haproxy

Thứ Sáu, 31 tháng 10, 2014

Thứ Sáu, 10 tháng 10, 2014

Installing PDO_OCI and OCI8 PHP extensions on CentOS 6.4 64bit

I am currently working on a PHP project that requires using an Oracle server as the database. I tried setting up the Oracle PHP extensions directly on my development machine (MacOSX) but failed after a few tries. I also managed to ruin my Homebrew-PHP setup which brought me more joy.
So I ended up using Vagrant which is what I should have done in the first place. So I booted up a Vagrant box with CentOS 6.4 64bit.
This tutorial assumes that you have already installed php and other packages (e.g. php-pdo) you normally need. This was also tested with an installation of Oracle 11g Express. I’m not sure if this will work for higher versions.

Dependencies

Oracle

Installing Oracle is easy. You can follow this tutorial by David Ghedini in installing Oracle 11g Express.

Development packages

$ sudo yum install php-pear php-devel zlib zlib-devel bc libaio glibc
$ sudo yum groupinstall "Development Tools"

InstantClient

Download Oracle InstantClient RPM files here. Put these files in your server. Download the basic and devel packages.
  • Basic: oracle-instantclient11.2-basic-11.2.0.3.0-1.x86_64.rpm
  • Devel: oracle-instantclient11.2-devel-11.2.0.3.0-1.x86_64.rpm
Install the downloaded rpm files:
$ sudo rpm -ivh oracle-instantclient11.2-basic-11.2.0.3.0-1.x86_64.rpm
$ sudo rpm -ivh oracle-instantclient11.2-devel-11.2.0.3.0-1.x86_64.rpm

$ sudo ln -s /usr/include/oracle/11.2/client64 /usr/include/oracle/11.2/client
$ sudo ln -s /usr/lib/oracle/11.2/client64 /usr/lib/oracle/11.2/client
Create a file inside /etc/profile.d named oracle.sh and put this as the content:
export LD_LIBRARY_PATH=/usr/lib/oracle/11.2/client64/lib
And run it so we’ll have LD_LIBRARY_PATH as an environment variable.
source /etc/profile.d/oracle.sh

PDO_OCI

Download the PDO_OCI source using pecl.
$ pecl download PDO_OCI
$ tar -xvf PDO_OCI-1.0.tgz
$ cd PDO_OCI-1.0
Inside the PDO_OCI-1.0 folder, edit the file named config.m4.
Find a pattern like this near line 10 and add these 2 lines:
elif test -f $PDO_OCI_DIR/lib/libclntsh.$SHLIB_SUFFIX_NAME.11.2; then
  PDO_OCI_VERSION=11.2
Find a pattern like this near line 101 and add these lines:
11.2)
  PHP_ADD_LIBRARY(clntsh, 1, PDO_OCI_SHARED_LIBADD)
  ;;
Build and install the extension.
$ phpize
$ ./configure --with-pdo-oci=instantclient,/usr,11.2
$ make
$ sudo make install
To enable the extension, add a file named pdo_oci.ini under /etc/php.d and put this as the content:
extension=pdo_oci.so
Validate that it was successfully installed.
$ php -i | grep oci
You should see something like this in the output:
/etc/php.d/pdo_oci.ini,
PDO drivers => oci, odbc, sqlite

OCI8

Download the OCI8 source using pear
$ pear download pecl/oci8
$ tar -xvf oci8-1.4.9.tgz
$ cd oci8-1.4.9
Build and install the extension.
$ phpize
$ ./configure --with-oci8=shared,instantclient,/usr/lib/oracle/11.2/client64/lib
$ make
$ sudo make install
To enable the extension, add a file named oci8.ini in /etc/php.d with this content:
extension=oci8.so
Validate that it was successfully installed.
$ php -i | grep oci8
You should see something like this:
/etc/php.d/oci8.ini,
oci8
oci8.connection_class => no value => no value
oci8.default_prefetch => 100 => 100
oci8.events => Off => Off
oci8.max_persistent => -1 => -1
oci8.old_oci_close_semantics => Off => Off
oci8.persistent_timeout => -1 => -1
oci8.ping_interval => 60 => 60
oci8.privileged_connect => Off => Off
oci8.statement_cache_size => 20 => 20

Finishing up

Do not forget to restart your web server (e.g. Apache). You can double check with phpinfo() if the extensions were successfully installed.
This tutorial wouldn’t have been possible without these references:
Source: http://shiki.me/blog/installing-pdo_oci-and-oci8-php-extensions-on-centos-6-4-64bit/

Thứ Bảy, 13 tháng 9, 2014

10 MySQL variables that you should monitor

This article is also available as a TechRepublic download.
Regardless of whether you're running a single MySQL server or a cluster of multiple servers, one thing you are always interested in is squeezing the maximum performance out of your system. MySQL's developers were well aware of this, and so they provided a fairly comprehensive list of performance variables that you can monitor in real time to check the health and performance of your MySQL server.

These variables are accessible via the SHOW STATUS command. In Table A, we've listed 10 of the most important performance variables you should monitor when using MySQL, and we explain which particular attribute each of them reflects.

Table A

Variable
What it represents
Why you should monitor it
Threads_connected
This variable indicates the total number of clients that have currently open connections to the server. It provides real-time information on how many clients are currently connected to the server. This can help in traffic analysis or in deciding the best time for a server re-start.
Created_tmp_disk_tables
This variable indicates the number of temporary tables that have been created on disk instead of in-memory.Accessing tables on disk is typically slower than accessing the same tables in memory. So queries that use the CREATE TEMPORARY TABLE syntax are likely to be slow when this value is high.
Handler_read_first
This variable indicates the number of times a table handler made a request to read the first row of a table index.If MySQL is frequently accessing the first row of a table index, it suggests that it is performing a sequential scan of the entire index. This indicates that the corresponding table is not properly indexed.
Innodb_buffer_pool_wait_free
This variable indicates the number of times MySQL has to wait for memory pages to be flushed.If this variable is high, it suggests that MySQL's memory buffer is incorrectly configured for the amount of writes the server is currently performing.
Key_reads
This variable indicates the number of filesystem accesses MySQL performed to fetch database indexes.Performing filesystem reads for database indexes slows query performance. If this variable is high, it indicates that MySQL's key cache is overloaded and should be reconfigured.
Max_used_connections
This variable indicates the maximum number of connections MySQL has had open at the same time since the server was last restarted.This value provides a benchmark to help you decide the maximum number of connections your server should support. It can also help in traffic analysis.
Open_tables
This variable indicates the number of tables that are currently open.This value is best analyzed in combination with the size of the table cache. If this value is low and the table_cache value is high, it's probably safe to reduce the cache size without affecting performance. On the other hand, if this value is high and close to the table_cache value, there is benefit in increasing the size of the table cache.
Select_full_join
This variable indicates the number of full joins MySQL has performed to satisfy client queries.A high value indicates that MySQL is being forced to perform full table joins (which are performance-intensive) instead of using indexes. This suggests a need for greater indexing of the corresponding tables.
Slow_queries
This variable indicates the number of queries that have taken longer than usual to execute.A high value indicates that many queries are not being optimally executed. A necessary next step would be to examine the slow query log and identify these slow queries for optimization.
Uptime
This variable indicates the number of seconds since the server was last restarted.This value is useful to analyze server uptime, as well as to generate reports on overall system performance. A consistent low value indicates that the server is being frequently restarted, thereby causing frequent interruptions to client service.


Source: http://www.techrepublic.com/blog/linux-and-open-source/10-mysql-variables-that-you-should-monitor/

Thứ Tư, 10 tháng 9, 2014

Guide install MySQL

set sql_mode = NO_ENGINE_SUBSTITUTION;


#Guideline MySQL
###Install gmake
tar zxvf cmake-VERSION.tar.gz
cd cmake-VERSION
./bootstrap
gmake
gmake install

###Required:
rpm -ivh ncurses-devel-5.7-3.20090208.el6.x86_64.rpm

###Install mysql
groupadd mysql
useradd -r -g mysql mysql
passwd mysql
tar zxvf mysql-VERSION.tar.gz
cd mysql-VERSION
cmake .
make -j4
make install

cd /usr/local/mysql
chown -R mysql .
chgrp -R mysql .
bin/mysql_install_db --user=mysql
chown -R root .
chown -R mysql:mysql /var/lib/mysql/
bin/mysqld_safe --user=mysql &
bin/mysql_secure_installation
cp support-files/mysql.server /etc/init.d/mysql.server
chkconfig mysql.server on


#Cau hinh /etc/my.cnf  (luu y cau hinh server-id, auto_increment_increment, auto_increment_offset
#Restart lai ung dung
#Grant quyen tuong ung

GRANT SELECT, INSERT, DELETE, UPDATE ON <database name>.* TO '<user>'@'<ip>' IDENTIFIED BY 'ke-34#$klZ' WITH GRANT OPTION;


GRANT SELECT, INSERT, DELETE, UPDATE, EVENT, EXECUTE ON <database name>.* TO '<user>'@'<ip>' IDENTIFIED BY 'wurfl-383#$k5Z' WITH GRANT OPTION;


#Cau hinh replication

GRANT REPLICATION SLAVE ON *.* TO 'replication'@'<ip>' IDENTIFIED BY '<password>';
CHANGE MASTER TO MASTER_HOST='<ip>', MASTER_USER='<user>', MASTER_PASSWORD='<user>', MASTER_PORT=3306,MASTER_LOG_FILE='pe-mysql3-bin.000001', MASTER_LOG_POS=120, MASTER_CONNECT_RETRY=10;


CHANGE MASTER TO MASTER_HOST='<ip>', MASTER_USER='<user>', MASTER_PASSWORD='slave', MASTER_PORT=3306,MASTER_LOG_FILE='pe-mysql5-bin.000001', MASTER_LOG_POS=120, MASTER_CONNECT_RETRY=10;
CHANGE MASTER TO MASTER_HOST='<ip>', MASTER_USER='<user>', MASTER_PASSWORD='slave', MASTER_PORT=3306,MASTER_LOG_FILE='pe-mysql6-bin.000001', MASTER_LOG_POS=120, MASTER_CONNECT_RETRY=10;


Guide install Nginx + PHP

cd SETUP/

tar -xzf zlib-1.2.8.tar.gz
tar -xzf pcre-8.33.tar.gz

#openssl
tar -xzf openssl-1.0.1h.tar.gz
cd openssl-1.0.1h
CFLAGS=-fPIC ./config shared --prefix=<home dir>/env/openssl-1.0.1h
make -j4
make install
cd ..


#Nginx
tar -xzf nginx-1.6.1.tar.gz
cd nginx-1.6.1
./configure --prefix=<home dir>/nginx --without-mail_pop3_module --without-mail_imap_module --without-mail_smtp_module --with-http_stub_status_module --with-http_gzip_static_module --with-pcre=../pcre-8.33 --with-zlib=../zlib-1.2.8 --with-http_ssl_module  --with-openssl=../openssl-1.0.1h
make -j4
make install
cd ..


tar -xzf php-5.5.16.tar.gz
cd php-5.5.16
./configure --prefix=<home dir>/php --with-mysql=mysqlnd --with-mysqli=mysqlnd --with-pdo-mysql=mysqlnd --enable-calendar --enable-soap --with-curl --with-gd --with-jpeg-dir=/usr/lib --with-png-dir=/usr/lib --with-zlib-dir=/usr/lib --with-freetype-dir=/usr/include/freetype2/  --enable-exif --enable-zip  --enable-mbstring   --with-openssl=<home dir>/env/openssl-1.0.1h  --enable-fpm  --enable-opcache  --with-mcrypt  --enable-soap
make -j4
make install
cd ..


###memcached
tar -xf memcache-2.2.7.tar
cd memcache-2.2.7
<home dir>/php/bin/phpize
./configure --with-php-config=<home dir>/php/bin/php-config
make -j4
make install

tar -xf ssh2-0.12.tar
cd ssh2-0.12
<home dir>/php/bin/phpize
./configure --with-php-config=<home dir>/php/bin/php-config
make -j4
make install


#copy fpm config. Change dir "Need change"
#<home dir>/php/etc/php-fpm.conf

#copy nginx config. Change dir "Need change"
#<home dir>/nginx/conf

#create php.ini

#killall -9 php-fpm;php/sbin/php-fpm

#insert to php.ini:
#extension=memcache.so


mkdir nginx/ssl
cd nginx/ssl
openssl genrsa -des3 -out self-ssl.key 1024
#(pass: 123456)
openssl req -new -key self-ssl.key -out self-ssl.csr
openssl x509 -req -days 3650 -in self-ssl.csr -signkey self-ssl.key -out self-ssl.crt

cp self-ssl.key self-ssl.key.org
openssl rsa -in self-ssl.key.org -out self-ssl.key

Iptable accept multicast

-A INPUT -m state --state NEW,ESTABLISHED,RELATED -m udp -p udp -d 224.0.0.0/24 --dport 7000:9000 -j ACCEPT

-A OUTPUT -m state --state NEW,ESTABLISHED,RELATED -m udp -p udp -d 224.0.0.0/24 --dport 7000:9000 -j ACCEPT

Grant permission MySQL

GRANT SELECT,UPDATE,INSERT,DELETE ON <ten database>.* TO 'user muon tao'@'192.168.5.%' IDENTIFIED BY 'pass muon tao' WITH GRANT OPTION;

GRANT SELECT,UPDATE,INSERT,DELETE,EVENT,EXECUTE ON <ten database terawurfl>.* TO 'user muon tao'@'192.168.5.%' IDENTIFIED BY 'pass muon tao' WITH GRANT OPTION;

Tìm 1 đoạn text trong thư mục hiện tại

find . -type f | xargs grep -rl '<search text>'

Rename file, chuyển ký tự space thành "_"

#!/bin/bash

ls | while read -r FILE
do
    mv -v "$FILE" `echo $FILE | tr ' ' '_' `
done

Thứ Năm, 22 tháng 5, 2014

HowTo: Create a Self-Signed SSL Certificate on Nginx For CentOS / RHEL

operate a small web site on Cloud server powered by CentOS Linux v6.4. I would like to encrypt my site's information and create a more secure connection. How do I create a self-signed SSL certificate on Nginx for CentOS/Fedora or Red Hat Enterprise Linux based server?

Tutorial details
DifficultyAdvanced (rss)
Root privilegesYes
Requirementsopenssl
Estimated completion time15m

The ssl encrypts your connection. For example, a visit to https://www.cyberciti.biz/ result into the following:
  1. All pages were encrypted before being transmitted over the Internet.
  2. Encryption makes it very difficult to unauthorized person to view information traveling between client browser and nginx server.

A note about a self-signed certificates vs a third party issued certificates

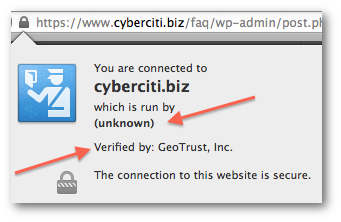
Fig.01: Cyberciti.biz connection encrypted and verified by a third party CA called GeoTrust, Inc.
  1. Usually, an SSL certificate issued by a third party. It provides privacy and security between two computers (client and server) on a public network by encrypting traffic. CA (Certificate Authorities) may issue you a SSL certificate that verify the organizational identity (company name), location, and server details.
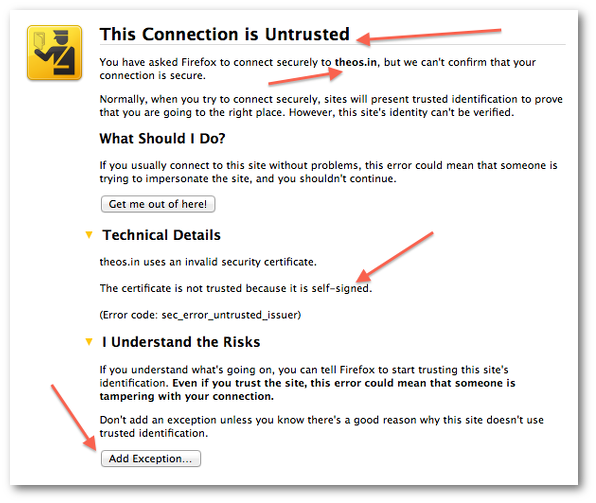
  2. A self-signed certificate encrypt traffic between client (browser) and server. However, it can not verify the organizational identity. You are not depend upon third party to verify your location and server details.

Our sample setup

  • Domain name: theos.in
  • Directory name: /etc/nginx/ssl/theos.in
  • SSL certificate file for theos.in: /etc/nginx/ssl/theos.in/self-ssl.crt
  • ssl certificate key for theos.in: /etc/nginx/ssl/theos.in/self-ssl.key
  • Nginx configuration file for theos.in: /etc/nginx/virtual/theos.in.conf

Step #1: Make sure SSL aware nginx installed

Simply type the following command to verify nginx version and feature:
$ /usr/sbin/nginx -V
Sample outputs
nginx version: nginx/1.4.3
built by gcc 4.4.7 20120313 (Red Hat 4.4.7-3) (GCC)
TLS SNI support enabled
configure arguments: --prefix=/etc/nginx --sbin-path=/usr/sbin/nginx --conf-path=/etc/nginx/nginx.conf
...
....
..
If nginx is not installed, type the following command to download and install nginx using yum command:
# yum install nginx
See how to install Nginx web server On CentOS Linux 6 or Red Hat Enterprise Linux 6 using yum command for more information.

Step #2: Create a directory

Type the following mkdir command to create a directory to store your ssl certificates:
# mkdir -p /etc/nginx/ssl/theos.in
Use the following cd command to change the directory:
# cd /etc/nginx/ssl/theos.in

Step #3: Create an SSL private key

To generate an SSL private key, enter:
# openssl genrsa -des3 -out self-ssl.key 1024
OR better try 2048 bit key:
# openssl genrsa -des3 -out self-ssl.key 2048
Sample outputs:
Generating RSA private key, 1024 bit long modulus
...++++++
...............++++++
e is 65537 (0x10001)
Enter pass phrase for self-ssl.key: Type-Your-PassPhrase-Here
Verifying - Enter pass phrase for self-ssl.key: Retype-Your-PassPhrase-Here
Warning: Make sure you remember passphrase. This passphrase is required to access your SSL key while generating csr or starting/stopping ssl.

Step #4: Create a certificate signing request (CSR)

To generate a CSR, enter:
# openssl req -new -key self-ssl.key -out self-ssl.csr
Sample outputs:
Enter pass phrase for self-ssl.key: Type-Your-PassPhrase-Here
You are about to be asked to enter information that will be incorporated
into your certificate request.
What you are about to enter is what is called a Distinguished Name or a DN.
There are quite a few fields but you can leave some blank
For some fields there will be a default value,
If you enter '.', the field will be left blank.
-----
Country Name (2 letter code) [XX]:IN
State or Province Name (full name) []:Delhi
Locality Name (eg, city) [Default City]:New Delhi
Organization Name (eg, company) [Default Company Ltd]:nixCraft LTD
Organizational Unit Name (eg, section) []:IT
Common Name (eg, your name or your server's hostname) []:theos.in
Email Address []:webmaster@nixcraft.com 
Please enter the following 'extra' attributes
to be sent with your certificate request
A challenge password []:
An optional company name []:

Step #5: Remove passphrase for nginx (optional)

You can remove passphrase from self-ssl.key for nginx server, enter:
# cp -v self-ssl.{key,original}
# openssl rsa -in self-ssl.original -out self-ssl.key
# rm -v self-ssl.original

Sample outputs:
Enter pass phrase for self-ssl.original: Type-Your-PassPhrase-Here
writing RSA key

Step #6: Create certificate

Finally, generate SSL certificate i.e. sign your SSL certificate with your own .csr file for one year:
# openssl x509 -req -days 365 -in self-ssl.csr -signkey self-ssl.key -out self-ssl.crt
Sample outputs:
Signature ok
subject=/C=IN/ST=Delhi/L=New Delhi/O=nixCraft LTD/OU=IT/CN=theos.in/emailAddress=webmaster@nixcraft.com
Getting Private key

Step #7: Configure the Certificate for nginx

Edit /etc/nginx/virtual/theos.in.conf, enter:
# vi /etc/nginx/virtual/theos.in.conf
The general syntax is as follows for nginx SSL configuration:
server {
    listen               443;
    ssl                  on;
    ssl_certificate      /path/to/self-ssl.crt;
    ssl_certificate_key  /path/to/self-ssl.key;
    server_name theos.in;
    location / {
       ....
       ...
       ....
    }
}
Here is my sample config for theos.in:
server {
    ###########################[Note]##############################
    ## Note: Replace IP and server name as per your actual setup ##
    ###############################################################
    ## IP:Port and server name
        listen 75.126.153.211:443;
        server_name theos.in;
    ## SSL settings
        ssl on;
        ssl_certificate /etc/nginx/ssl/theos.in/self-ssl.crt;
        ssl_certificate_key /etc/nginx/ssl/theos.in/self-ssl.key;
    ## SSL caching/optimization
        ssl_protocols        SSLv3 TLSv1 TLSv1.1 TLSv1.2;
        ssl_ciphers RC4:HIGH:!aNULL:!MD5;
        ssl_prefer_server_ciphers on;
        keepalive_timeout    60;
        ssl_session_cache    shared:SSL:10m;
        ssl_session_timeout  10m;
    ## SSL log files
        access_log /var/log/nginx/theos.in/ssl_theos.in_access.log;
        error_log /var/log/nginx/theos.in/ssl_theos.in_error.log;
    ## Rest of server config goes here
        location / {
                proxy_set_header        Accept-Encoding   "";
                proxy_set_header        Host              $http_host;
                proxy_set_header        X-Forwarded-By    $server_addr:$server_port;
                proxy_set_header        X-Forwarded-For   $remote_addr;
                proxy_set_header        X-Forwarded-Proto $scheme;
                proxy_set_header        X-Real-IP               $remote_addr;
                proxy_next_upstream error timeout invalid_header http_500 http_502 http_503 http_504;
                ## Hey, ADD YOUR location / specific CONFIG HERE ##
                ## STOP: YOUR location / specific CONFIG HERE ##
        }
}

Step #8: Restart/reload nginx

Type the following command
# /usr/sbin/nginx -t
Sample outputs:
nginx: the configuration file /etc/nginx/nginx.conf syntax is ok
nginx: configuration file /etc/nginx/nginx.conf test is successful
To gracefully restart/reload nginx server, type the following command:
# /etc/init.d/nginx reload
OR
# /usr/sbin/nginx -s reload
OR
# service nginx reload

Step #9: Open TCP HTTPS port # 443

Type the following command to open port # 443 for everyone:
# /sbin/iptables -A INPUT -m state --state NEW -p tcp --dport 443 -j ACCEPT
Save new firewall settings:
# service iptables save
See how to setup firewall for a web server for more information.

Step 10: Test it

Fire a browser and type the following url:
https://theos.in/
Sample outputs:
Fig.02: SSL connection is not verified due to self-signed certificate. Click the
Fig.02: SSL connection is not verified due to self-signed certificate. Click the "Add Exception" button to continue.

Step 11: Verify SSL certificats

You can verify SSL Certificate using the following command:
# openssl verify pem-file
# openssl verify self-ssl.crt
SEE ALSO

Thứ Sáu, 21 tháng 2, 2014

Capture signal to file


ffmpeg -i <input> -vcodec copy -acodec copy -f mp4 -y <out.mp4>

vlc -vvv <input> --sout='#std{access=file,mux=ts,dst=<out.mp4>}'


Đảm bảo các điều kiện sau:
- Hỗ trợ driver linux

- Video:
+ Chất lượng: 1080x720
+ Frame: >= 24

- Audio:
+ Channel: stereo
+ >22k MHZ


- Test bằng giác quan (mắt) không bị vỡ hình và đứng hình.

Thứ Hai, 17 tháng 2, 2014

Blackmagic usage

https://forum.videolan.org/viewtopic.php?f=13&t=100499

http://forum.blackmagicdesign.com/viewtopic.php?f=12&t=9654

http://www.blackmagicdesign.com/media/6949758/Desktop_Video_Manual_October_2013.pdf

Thứ Sáu, 17 tháng 1, 2014

Các bước cài đặt haproxy


1 - Get latest (stable) HAProxy:
$ curl -O http://haproxy.1wt.eu/download/1.4/src/haproxy-1.4.21.tar.gz
$ tar xzpvf haproxy-1.4.21.tar.gz
$ cd haproxy-1.4.21
2 - Compile:
$ make TARGET=generic ARCH=x86_64 USE_PCRE=1 3 - Install:
$ make install DESTDIR='/usr/local/haproxy' PREFIX=''
After installing HAProxy get the following sample configuration and save it to a file named haproxy.cfg .

Run HAProxy with:
$ ~/opt/haproxy/sbin/haproxy -f haproxy.conf


Nguồn: http://blog.pedrocarrico.net/post/25226892944/setting-up-haproxy-in-your-development-environment 


Tạo file init.d để start|stop:


#!/bin/sh
#
# custom haproxy init.d script, by Mattias Geniar
#
# haproxy starting and stopping the haproxy load balancer
#
# chkconfig: 345 55 45
# description: haproxy is a TCP loadbalancer
# probe: true

# Source function library.
. /etc/rc.d/init.d/functions

# Source networking configuration.
. /etc/sysconfig/network

# Check that networking is up.
[ ${NETWORKING} = "no" ] && exit 0

[ -f /usr/local/sbin/haproxy ] || exit 0

[ -f /usr/local/haproxy/haproxy.cfg ] || exit 0

# Define our actions
checkconfig() {
# Check the config file for errors
/usr/local/sbin/haproxy -c -q -f /usr/local/haproxy/haproxy.cfg
if [ $? -ne 0 ]; then
echo "Errors found in configuration file."
return 1
fi

# We're OK!
return 0
}

start() {
# Check config
/usr/local/sbin/haproxy -c -q -f /usr/local/haproxy/haproxy.cfg
if [ $? -ne 0 ]; then
echo "Errors found in configuration file."
return 1
fi

echo -n "Starting HAProxy: "
daemon /usr/local/sbin/haproxy -D -f /usr/local/haproxy/haproxy.cfg -p /var/run/haproxy.pid

RETVAL=$?
echo
[ $RETVAL -eq 0 ] && touch /var/lock/subsys/haproxy
return $RETVAL
}

stop() {
echo -n "Shutting down HAProxy: "
killproc haproxy -USR1

RETVAL=$?
echo
[ $RETVAL -eq 0 ] && rm -f /var/lock/subsys/haproxy
[ $RETVAL -eq 0 ] && rm -f /var/run/haproxy.pid
return $RETVAL
}

restart() {
/usr/local/sbin/haproxy -c -q -f /usr/local/haproxy/haproxy.cfg
if [ $? -ne 0 ]; then
echo "Errors found in configuration file."
return 1
fi

stop
start
}

check() {
/usr/local/sbin/haproxy -c -q -V -f /usr/local/haproxy/haproxy.cfg
}

rhstatus() {
status haproxy
}

reload() {
/usr/local/sbin/haproxy -c -q -f /usr/local/haproxy/haproxy.cfg
if [ $? -ne 0 ]; then
echo "Errors found in configuration file."
return 1
fi

echo -n "Reloading HAProxy config: "
/usr/local/sbin/haproxy -f /usr/local/haproxy/haproxy.cfg -p /var/run/haproxy.pid -sf $(cat /var/run/haproxy.pid)

success $"Reloading HAProxy config: "
echo
}

# Possible parameters
case "$1" in
start)
start
;;
stop)
stop
;;
status)
rhstatus
;;
restart)
restart
;;
reload)
reload
;;
checkconfig)
check
;;
*)
echo "Usage: haproxy {start|stop|status|restart|reload|checkconfig}"
exit 1
esac

exit 0

Thứ Hai, 13 tháng 1, 2014

Building HA Load Balancer with HAProxy and keepalived

For this tutorial I'll demonstrate how to build a simple yet scalable highly available HTTP load balancer using HAProxy [1] and keepalived [2], then later I'll show how to front-end HAProxy with Pound [5] and implement SSL termination and redirect the insecure connections from port 80 to 443.
Let's assume we have two servers LB1 and LB2 that will host HAProxy and will be made highly available through the use of the VRRP protocol [3] as implemented by keepalived. LB1 will have an IP address of 192.168.29.129 and LB2 will have an IP address of 192.168.29.130. The HAProxy will listen on the "shared/floating" IP address of 192.168.29.100, which will be raised on the active LB1. If LB1 fails that IP will be moved and raised on LB2 with the help of keepalived.
We are also going to have two back-end nodes that run apache -  WEB1 192.168.29.131 and WEB2 192.168.29.132 - that will be receiving traffic from the HAProxy using round-robing load-balancing algorithm.
First let's install keepalived on both LB1 and LB2. We can either get it from the EPEL repo, or install it from source.
1
2
[root@lb1 ~] rpm -Uvh http://download.fedoraproject.org/pub/epel/6/i386/epel-release-6-5.noarch.rpm
[root@lb1 ~] yum install keepalived
Edit the configuration file on both servers to match except the priority parameter:
1
2
3
4
5
6
7
8
9
10
11
12
13
14
15
16
17
18
19
20
[root@lb1 ~] vi /etc/keepalived/keepalived.conf
 
vrrp_script chk_haproxy {
      script "killall -0 haproxy"
      interval 2
      weight 2
}
 
vrrp_instance VI_1 {
      interface eth0
      state MASTER
      virtual_router_id 51
      priority 101          # 101 on master, 100 on backup
      virtual_ipaddress {
           192.168.29.100
      }
      track_script {
           chk_haproxy
      }
}
Save the config on both servers and start keepalived:
1
[root@lb1 ~] /etc/init.d/keepalived start
Now that keepalived is running check that LB1 has raised 192.168.29.100:
1
2
[root@lb1 ~] ip addr show | grep 192.168.29.100
inet 192.168.29.100/32 scope global eth0
You can test if the IP will move from LB1 to LB2 by failing LB1 (shutdown or bring the network down) and running the above command on LB2.
Now that we have high availability of the IP resource we can install HAProxy on LB1 and LB2:
1
[root@lb1 ~] yum install haproxy
Edit the configuration file, and start HAProxy:
1
2
3
4
5
6
7
8
9
10
11
12
13
14
15
16
17
18
19
20
21
22
23
24
25
26
27
28
29
30
31
32
[root@lb1 ~] vi /etc/haproxy/haproxy.cfg
 
global
        log 127.0.0.1   local7 info
        maxconn 4096
        user haproxy
        group haproxy
        daemon
        #debug
        #quiet
 
defaults
        log     global
        mode    http
        option  httplog
        option  dontlognull
        retries 3
        option redispatch
        maxconn 2000
        contimeout      5000
        clitimeout      50000
        srvtimeout      50000
 
listen webfarm 192.168.29.100:80
      mode http
      balance roundrobin
      cookie JSESSIONID prefix
      option httpclose
      option forwardfor
      option httpchk HEAD /index.html HTTP/1.0
      server webA webserver1.example.net:80 cookie A check
      server webB webserver2.example.net:80 cookie B check
This is a very simplistic configuration that uses HTTP load-balancing with cookie prefixing. This is how it works:
- LB1 is VRRP master (keepalived), LB2 is backup. Both monitor the haproxy process, and lower their prio if it fails, leading to a failover to theother node.
- LB1 will receive clients requests on IP 192.168.29.100.
- both load-balancers send their checks from their native IP.
- if a request does not contain a cookie, it will be forwarded to a validserver
- in return, if a JESSIONID cookie is seen, the server name will be prefixedinto it, followed by a delimitor ('~')
- when the client comes again with the cookie "JSESSIONID=A~xxx", LB1 will know that it must be forwarded to server A. The server name will then be extracted from the cookie before it is sent to the server.
- if server "webA" dies, the requests will be sent to another valid serverand a cookie will be reassigned.
For more information and examples see [4].
Let's start HA proxy on both LB's:
1
[root@lb1 ~] /etc/init.d/haproxy start
To start it on LB2 you might have to fail LB1 first so that the shared IP moves to LB2 or make the following kernel change:
1
[root@web1 ~] sysctl -w net.ipv4.ip_nonlocal_bind=1
On the back-end apache nodes create a simple index.html like so:
1
2
3
4
5
6
7
[root@web1 ~] cat /var/www/html/index.html
 
This is Web Node 1
 
[root@web2 ~] cat /var/www/html/index.html
 
This is Web Node 2
Now hit 192.168.29.100 in your browser and refresh few times. You should see both nodes rotating in a round-robin fashion.
Also test the HA setup by failing one of the LB servers making sure that you always get a response back from the back-end nodes. Do the same for the back-end nodes.

To send logs from HAProxy to syslog-ng add the following lines to the syslog-ng config file:

1
2
3
4
5
6
7
8
9
10
11
[root@logserver ~] vi /etc/syslog-ng/syslog-ng.conf
 
source s_all {
    udp(ip(127.0.0.1) port(514));
};
 
destination df_haproxy { file("/var/log/haproxy.log"); };
 
filter f_haproxy { facility(local7); };
 
log { source(s_all); filter(f_haproxy); destination(df_haproxy); };
We can use Pound, which is a reverse proxy that supports SSL termination to listen for SSL connections on port 443 and terminate them using a local certificate. Pound will then insert a header in each HTTP packet called "X-Forwarded-Proto: https" that HAproxy will look for and if absent HAProxy will forward the insecure connections to port 443.
Installing pound is straight forward and can be done from a package or from source. Once installed the config file should look like this:
1
2
3
4
5
6
7
8
9
10
11
12
13
14
15
16
17
18
19
20
21
22
23
24
25
26
27
28
29
[root@lb1 ~] cat /etc/pound/pound.cfg
 
User            "www-data"
Group           "www-data"
 
LogLevel        3
 
## check backend every X secs:
Alive           5
 
Control "/var/run/pound/poundctl.socket"
 
ListenHTTPS
        Address 192.168.29.100
        Port    443
        AddHeader "X-Forwarded-Proto: https"
        Cert    "/etc/ssl/local.server.pem"
 
        xHTTP           0
 
        Service
                BackEnd
                        Address 192.168.29.100
                        Port    80
                End
        End
End
 
[root@lb1 ~] /etc/init.d/pound start
Pound will now listen on port 443 for secure connections, terminate them using the local.server.pem certificate then inset the "X-Forwarded-Proto: https" header in the HTTP packet and forward it to HAProxy which is running and listening on the same host on port 80.
To make HAProxy forward all insecure connections from port 80 to port 443 all we need to do is create an access list that looks for the header that Pound inserts and if missing redirect the HTTP connections to Pound (listening on port 443).
The new config needs to look like this:
1
2
3
4
5
6
7
8
9
10
11
12
13
14
15
16
17
18
19
20
21
22
23
24
25
26
27
28
29
30
31
32
33
34
[root@lb1 ~] cat /etc/haproxy/haproxy.cfg
 
global
        log 127.0.0.1   local7 info
        maxconn 4096
        user haproxy
        group haproxy
        daemon
        #debug
        #quiet
 
defaults
        log     global
        mode    http
        option  httplog
        option  dontlognull
        retries 3
        option redispatch
        maxconn 2000
        contimeout      5000
        clitimeout      50000
        srvtimeout      50000
 
listen webfarm 192.168.29.100:80
      mode http
      balance roundrobin
      cookie JSESSIONID prefix
      option httpclose
      option forwardfor
      option httpchk HEAD /index.html HTTP/1.0
      acl x_proto hdr(X-Forwarded-Proto) -i https
      redirect location https://192.168.29.100/ if !x_proto
      server webA webserver1.example.net:80 cookie A check
      server webB webserver2.example.net:80 cookie B check
The two new lines at 31 and 32 create an access list that looks for (case insensitive -i) the https string in the X-Forwarded-Proto header. If the string is not there (meaning the connection came on port 80 directly hitting HAproxy) redirect to the secure SSL port 443 that Pound is listening on. This will ensure that each time a client hits port 80 the connection will be redirected to port 443 and secured. Same goes for if the client connects directly to port 443.
To generate a self-signed cert to use in Pound run this:
1
[root@lb1 ~] openssl req -x509 -newkey rsa:1024 -keyout local.server.pem -out local.server.pem -days 365 -nodes

Resources:
[1] http://haproxy.1wt.eu/
[2] http://www.keepalived.org/
[3] http://en.wikipedia.org/wiki/Virtual_Router_Redundancy_Protocol
[4] http://haproxy.1wt.eu/download/1.2/doc/architecture.txt
[5] http://www.apsis.ch/pound/
 
Nguồn: http://kaivanov.blogspot.com/2012/02/building-ha-load-balancer-with-haproxy.html