Thứ Ba, 27 tháng 10, 2015

Shell In A Box – A Web-Based SSH Terminal to Access Remote Linux Servers

Shell In A Box (pronounced as shellinabox) is a web based terminal emulator created by Markus Gutschke. It has built-in web server that runs as a web-based SSH client on a specified port and prompt you a web terminal emulator to access and control your Linux Server SSH Shell remotely using any AJAX/JavaScript and CSSenabled browsers without the need of any additional browser plugins such as FireSSH.
In this tutorial, I describe how to install Shellinabox and access remote SSH terminal using a modern web browser on any machine. Web-based SSH is very useful when you are protected with firewall and only HTTP(s) traffic can get through.

Installing Shellinabox on Linux

By default, Shellinabox tool is included on many Linux distributions through default repositories, includingDebianUbuntu and Linux Mint.
Make sure that your repository enabled and available to install Shellinabox from the that repository. To check, do a search for Shellinabox with the “apt-cache” command and then install it using “apt-get” command. `
On Debian, Ubuntu and Linux Mint
$ sudo apt-cache search shellinabox
$ sudo apt-get install openssl shellinabox
On RHEL, CentOS and Fedora
On Red Hat based distributions, you need to first have enable EPEL repository and then install it using the following “yum” command. (Fedora users don’t need to enable EPEL, it’s already a part of Fedora project).
# yum install openssl shellinabox

Configuring Shellinabox

By default, shellinaboxd listens on TCP port 4200 on localhost. For security reason, I change this default port to a random (i.e. 6175) to make it difficult for anyone to reach your SSH box. Also, during installation a new self-signed SSL certificate automatically created under “/var/lib/shellinabox” to use HTTPS protocol.
On Debian, Ubuntu and Linux Mint
$ sudo vi /etc/default/shellinabox
# TCP port that shellinboxd's webserver listens on
SHELLINABOX_PORT=6175

# specify the IP address of a destination SSH server
SHELLINABOX_ARGS="--o-beep -s /:SSH:172.16.25.125"

# if you want to restrict access to shellinaboxd from localhost only
SHELLINABOX_ARGS="--o-beep -s /:SSH:172.16.25.125 --localhost-only"
On RHEL, CentOS and Fedora
# vi /etc/sysconfig/shellinaboxd
# TCP port that shellinboxd's webserver listens on
PORT=6175

# specify the IP address of a destination SSH server
OPTS="-s /:SSH:172.16.25.125"

# if you want to restrict access to shellinaboxd from localhost only
OPTS="-s /:SSH:172.16.25.125 --localhost-only"

Starting Shellinabox

Once you’ve done with the configuration, you can start the service by issuing following command.
On Debian, Ubuntu and Linux Mint
$ sudo service shellinaboxd start
On RHEL and CentOS
# service shellinaboxd start
On Fedora
# systemctl enable shellinaboxd.service
# systemctl start shellinaboxd.service

Verify Shellinabox

Now let’s verify whether Shellinabox is running on port 6175 using “netstat” command.
$ sudo netstat -nap | grep shellinabox
or
# netstat -nap | grep shellinabox
tcp        0      0 0.0.0.0:6175            0.0.0.0:*               LISTEN      12274/shellinaboxd
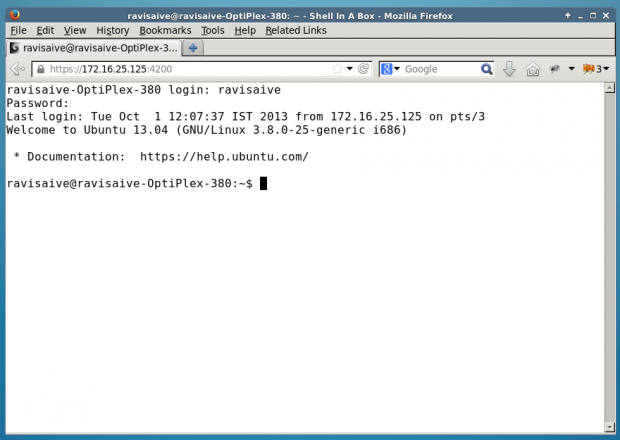
Now open up your web browser, and navigate to https://Your-IP-Adress:6175. You should be able to see a web-based SSH terminal. Login using your username and password and you should be presented with your shell prompt.
Install Shellinabox in Linux
Shellinabox SSH Login
Shellinabox SSH Shell
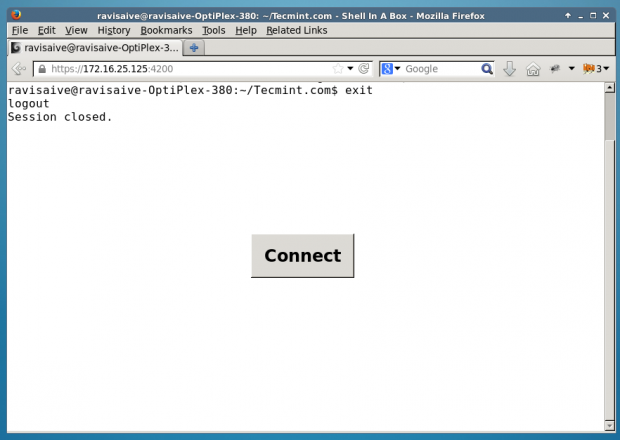
Shellinabox SSH Logout
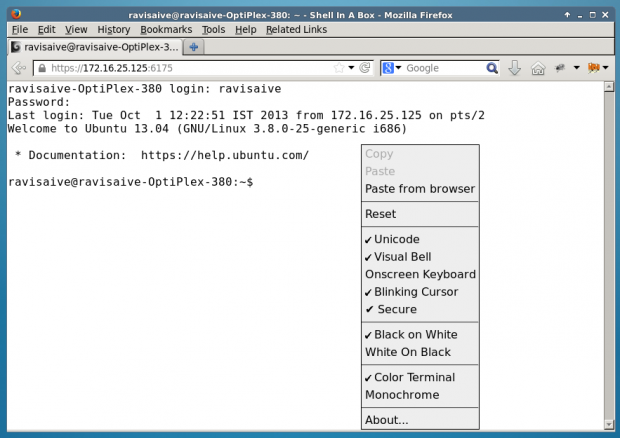
You can right-click to use several features and actions, including changing the look and feel of your shell.
Shellinabox More Options
Make sure you secure you shellinabox on firewall and open 6175 port for specific IP Address to access your Linux shell remotely.
Source: http://www.tecmint.com/shell-in-a-box-a-web-based-ssh-terminal-to-access-remote-linux-servers/
Thứ Bảy, 24 tháng 10, 2015

Các vấn đề đang quan tâm

- Recommender system
- CQRS: http://www.slideshare.net/HanoiItlc/itlc-hanoi-cqrs-es-2210-2015?from_m_app=android
- X-XSS-Protection firewall

Thứ Hai, 19 tháng 10, 2015

Following up network connections with conntrack

Linux has got the ability to perform a monitoring of existing connections by means of the conntrack module, which is compiled but not installed in distributions such as RHEL or CentOS. In order to load it, you can run the next order.

[root@centos ~]# modprobe ip_conntrack

In other operating systems like Debian or Ubuntu Server, first of all you must install the conntrack package and load thenf_conntrack_ipv4 module (if you want to work with IPv6, you will have to load the nf_conntrack_ipv6 module).

root@ubuntu-server:~# aptitude install conntrack

root@ubuntu-server:~# modprobe nf_conntrack_ipv4

The conntrack module allows the kernel to register in a table all network connections of the system (established, time_wait, close, etc.). It used by several applications such as iptstate (it shows information about the state of the system connections) or Shorewall (firewall).

Another example of use for this module it is for instance, when the server has to realize NAT tasks with iptables and it is necessary to keep a table of connections implicated.

The file where conntrack logs all connections is /proc/net/ip_conntrack.

root@ubuntu-server:~# cat /proc/net/ip_conntrack
tcp      6 89 TIME_WAIT src=192.168.1.11 dst=192.168.1.12 sport=59302 dport=10050 packets=5 bytes=291 src=192.168.1.12 dst=192.168.1.11 sport=10050 dport=59302 packets=5 bytes=289 [ASSURED] mark=0 secmark=0 use=1
...

root@ubuntu-server:~# conntrack -L
tcp      6 89 TIME_WAIT src=192.168.1.11 dst=192.168.1.12 sport=59302 dport=10050 packets=5 bytes=291 src=192.168.1.12 dst=192.168.1.11 sport=10050 dport=59302 packets=5 bytes=289 [ASSURED] mark=0 secmark=0 use=1
...

The two first fields are the connection protocol (TCP, 6) and then is the connection state (TIME_WAIT). The rest of the fields represent the IP addresses and ports involved, as well as the number of packets and bytes exchanged between the two points of the connection.

You have also to take into account that Linux saves the connection state in memory, and each of them uses around 350 bytes.

If you want to know how many open connections has got the system, you can utilize the following sentences.

root@ubuntu-server:~# cat /proc/net/ip_conntrack | wc -l
856

root@ubuntu-server:~# cat /proc/sys/net/ipv4/netfilter/ip_conntrack_count
856

root@ubuntu-server:~# conntrack -C
856

This value is quite important because if at any moment we appreciate that any of our services works slowly (for instance Apache) or many connections are rejected, it can be due to which the number of open connections exceeds the maximum number of connections allowed.

root@ubuntu-server:~# cat /proc/sys/net/ipv4/netfilter/ip_conntrack_max
65536

The size of the hash table is also limited.

root@ubuntu-server:~# cat /proc/sys/net/ipv4/netfilter/ip_conntrack_buckets
16384

If you want to modify it, you must do it when the module is loaded.

root@ubuntu-server:~# modprobe nf_conntrack_ipv4 hashsize=32768


Other important parameters which can be changed to optimize the system are related to the time of the different types of connections.

root@ubuntu-server:~# cat /proc/sys/net/ipv4/netfilter/ip_conntrack_tcp_timeout_established
432000

root@ubuntu-server:~# cat /proc/sys/net/ipv4/netfilter/ip_conntrack_tcp_timeout_time_wait
120

root@ubuntu-server:~# cat /proc/sys/net/ipv4/netfilter/ip_conntrack_tcp_timeout_close_wait
60

The first parameter sets up the maximum lifetime for an already established connection (432000 sg can be long; 28800 could be enough). The second and third are the maximum lifetime for a waiting connection and for the remote endpoint closes the socket.

So as to list all variables based on the conntrack module, type the next order.

root@ubuntu-server:~# sysctl -a | grep conntrack | grep ipv4
net.ipv4.netfilter.ip_conntrack_generic_timeout = 600
net.ipv4.netfilter.ip_conntrack_tcp_timeout_syn_sent = 120
net.ipv4.netfilter.ip_conntrack_tcp_timeout_syn_sent2 = 120
net.ipv4.netfilter.ip_conntrack_tcp_timeout_syn_recv = 60
net.ipv4.netfilter.ip_conntrack_tcp_timeout_established = 432000
net.ipv4.netfilter.ip_conntrack_tcp_timeout_fin_wait = 120
net.ipv4.netfilter.ip_conntrack_tcp_timeout_close_wait = 60
net.ipv4.netfilter.ip_conntrack_tcp_timeout_last_ack = 30
net.ipv4.netfilter.ip_conntrack_tcp_timeout_time_wait = 120
net.ipv4.netfilter.ip_conntrack_tcp_timeout_close = 10
net.ipv4.netfilter.ip_conntrack_tcp_timeout_max_retrans = 300
net.ipv4.netfilter.ip_conntrack_tcp_loose = 1
net.ipv4.netfilter.ip_conntrack_tcp_be_liberal = 0
net.ipv4.netfilter.ip_conntrack_tcp_max_retrans = 3
net.ipv4.netfilter.ip_conntrack_udp_timeout = 30
net.ipv4.netfilter.ip_conntrack_udp_timeout_stream = 180
net.ipv4.netfilter.ip_conntrack_icmp_timeout = 30
net.ipv4.netfilter.ip_conntrack_max = 15768
net.ipv4.netfilter.ip_conntrack_count = 2
net.ipv4.netfilter.ip_conntrack_buckets = 4096
net.ipv4.netfilter.ip_conntrack_checksum = 1
net.ipv4.netfilter.ip_conntrack_log_invalid = 0

And if you want to change the value of any variable, you must add it within the sysctl.conf file and reload the settings.

root@ubuntu-server:~# cat /etc/sysctl.conf
...
net.ipv4.netfilter.ip_conntrack_max = 131072

root@ubuntu-server:~# sysctl -p

One interesting option for the conntrack command is the possibility to get the statistics about the connection tracking.

root@ubuntu-server:~# conntrack -S
entries                 2  
searched                0  
found                   1107
new                     4  
invalid                 0  
ignore                  0  
delete                  2  
delete_list             2  
insert                  4  
insert_failed           0  
drop                    0  
early_drop              0  
icmp_error              0  
expect_new              0  
expect_create           0  
expect_delete           0  
search_restart          0

Another useful feature for conntrack is to output the connection state on real-time, similar to when you run a "tail -f" on a file.

root@ubuntu-server:~# conntrack -E

We can conclude with this couple of articles that the conntrack module is other helpful way to improve the Linux performance.


Source: http://redes-privadas-virtuales.blogspot.com/2011/02/following-up-network-connections-with_27.html

Chủ Nhật, 18 tháng 10, 2015

Mysqldump ignore some tables

mysqldump -u username -p database --ignore-table=database.table1 > database.sql
If you want to ignore multiple tables you can use a simple script like this
#!/bin/bash
PASSWORD=XXXXXX
HOST=XXXXXX
USER=XXXXXX
DATABASE=databasename
DB_FILE=dump.sql
EXCLUDED_TABLES=(
table1
table2
table3
table4
tableN   
)

IGNORED_TABLES_STRING=''
for TABLE in "${EXCLUDED_TABLES[@]}"
do :
   IGNORED_TABLES_STRING+=" --ignore-table=${DATABASE}.${TABLE}"
done

echo "Dump structure"
mysqldump --host=${HOST} --user=${USER} --password=${PASSWORD} --single-transaction --no-data ${DATABASE} > ${DB_FILE}

echo "Dump content"
mysqldump --host=${HOST} --user=${USER} --password=${PASSWORD} ${DATABASE} ${IGNORED_TABLES_STRING} >> ${DB_FILE}
Source: http://stackoverflow.com/questions/425158/skip-certain-tables-with-mysqldump